

TMSS is the Telescope Manager Specification System used for specification and (dynamic) scheduling of LOFAR observations.
The goal of this document is to familiarize users with the most common TMSS use cases applicable to different types of user roles. Its main areas of interest are:
- Landing and login / profile editing.
- Observation specification.
- Scheduling units creation and editing.
- Inspecting of schedules and preforming actions on the timeline.
Logging into TMSS
Navigating to the TMSS landing page, the user is presented with the log in screen:
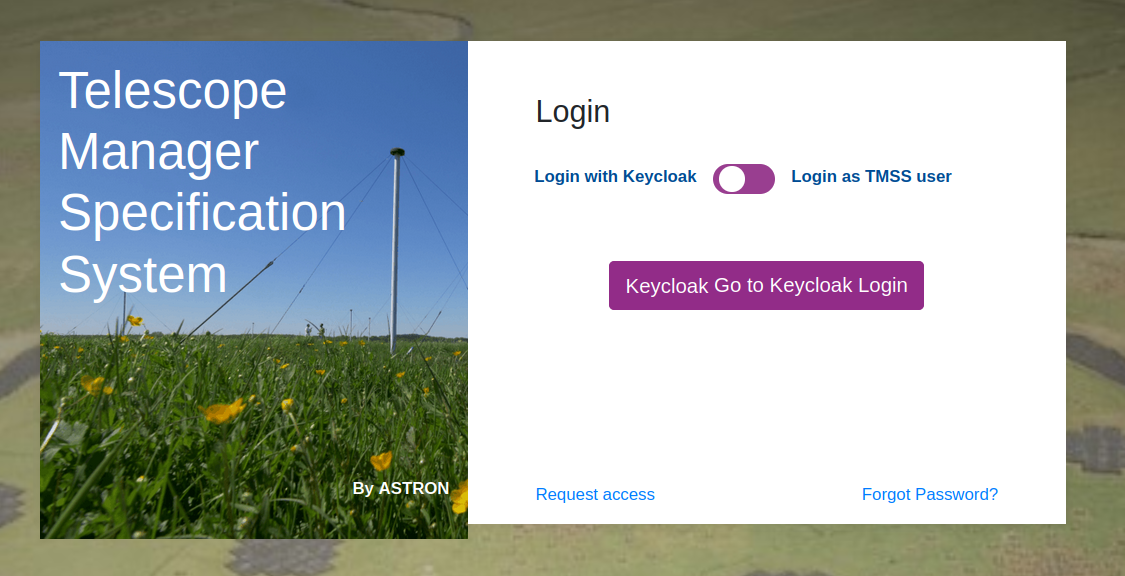
Users can access TMSS with a LOFAR account that is also used for NorthStar and the old observation specification system, MoM; this corresponds to the "Login with Keycloak" option shown on the log in screen:
- If you had a LOFAR account before, but forgot your password, please use the Forgot Password link instead of making a new account.
- Also, please check first that you have the right password to your account by logging into the NorthStar proposal tool for LOFAR.
If you don't have a LOFAR account, you can create a new account.
If you can log into NorthStar, but not TMSS, then please send a request to the SDC helpdesk stating: "I have created an account with user name <USERNAME>. Can you grant me access on this account to TMSS?"
You may need to reset your password for your LOFAR account to work.
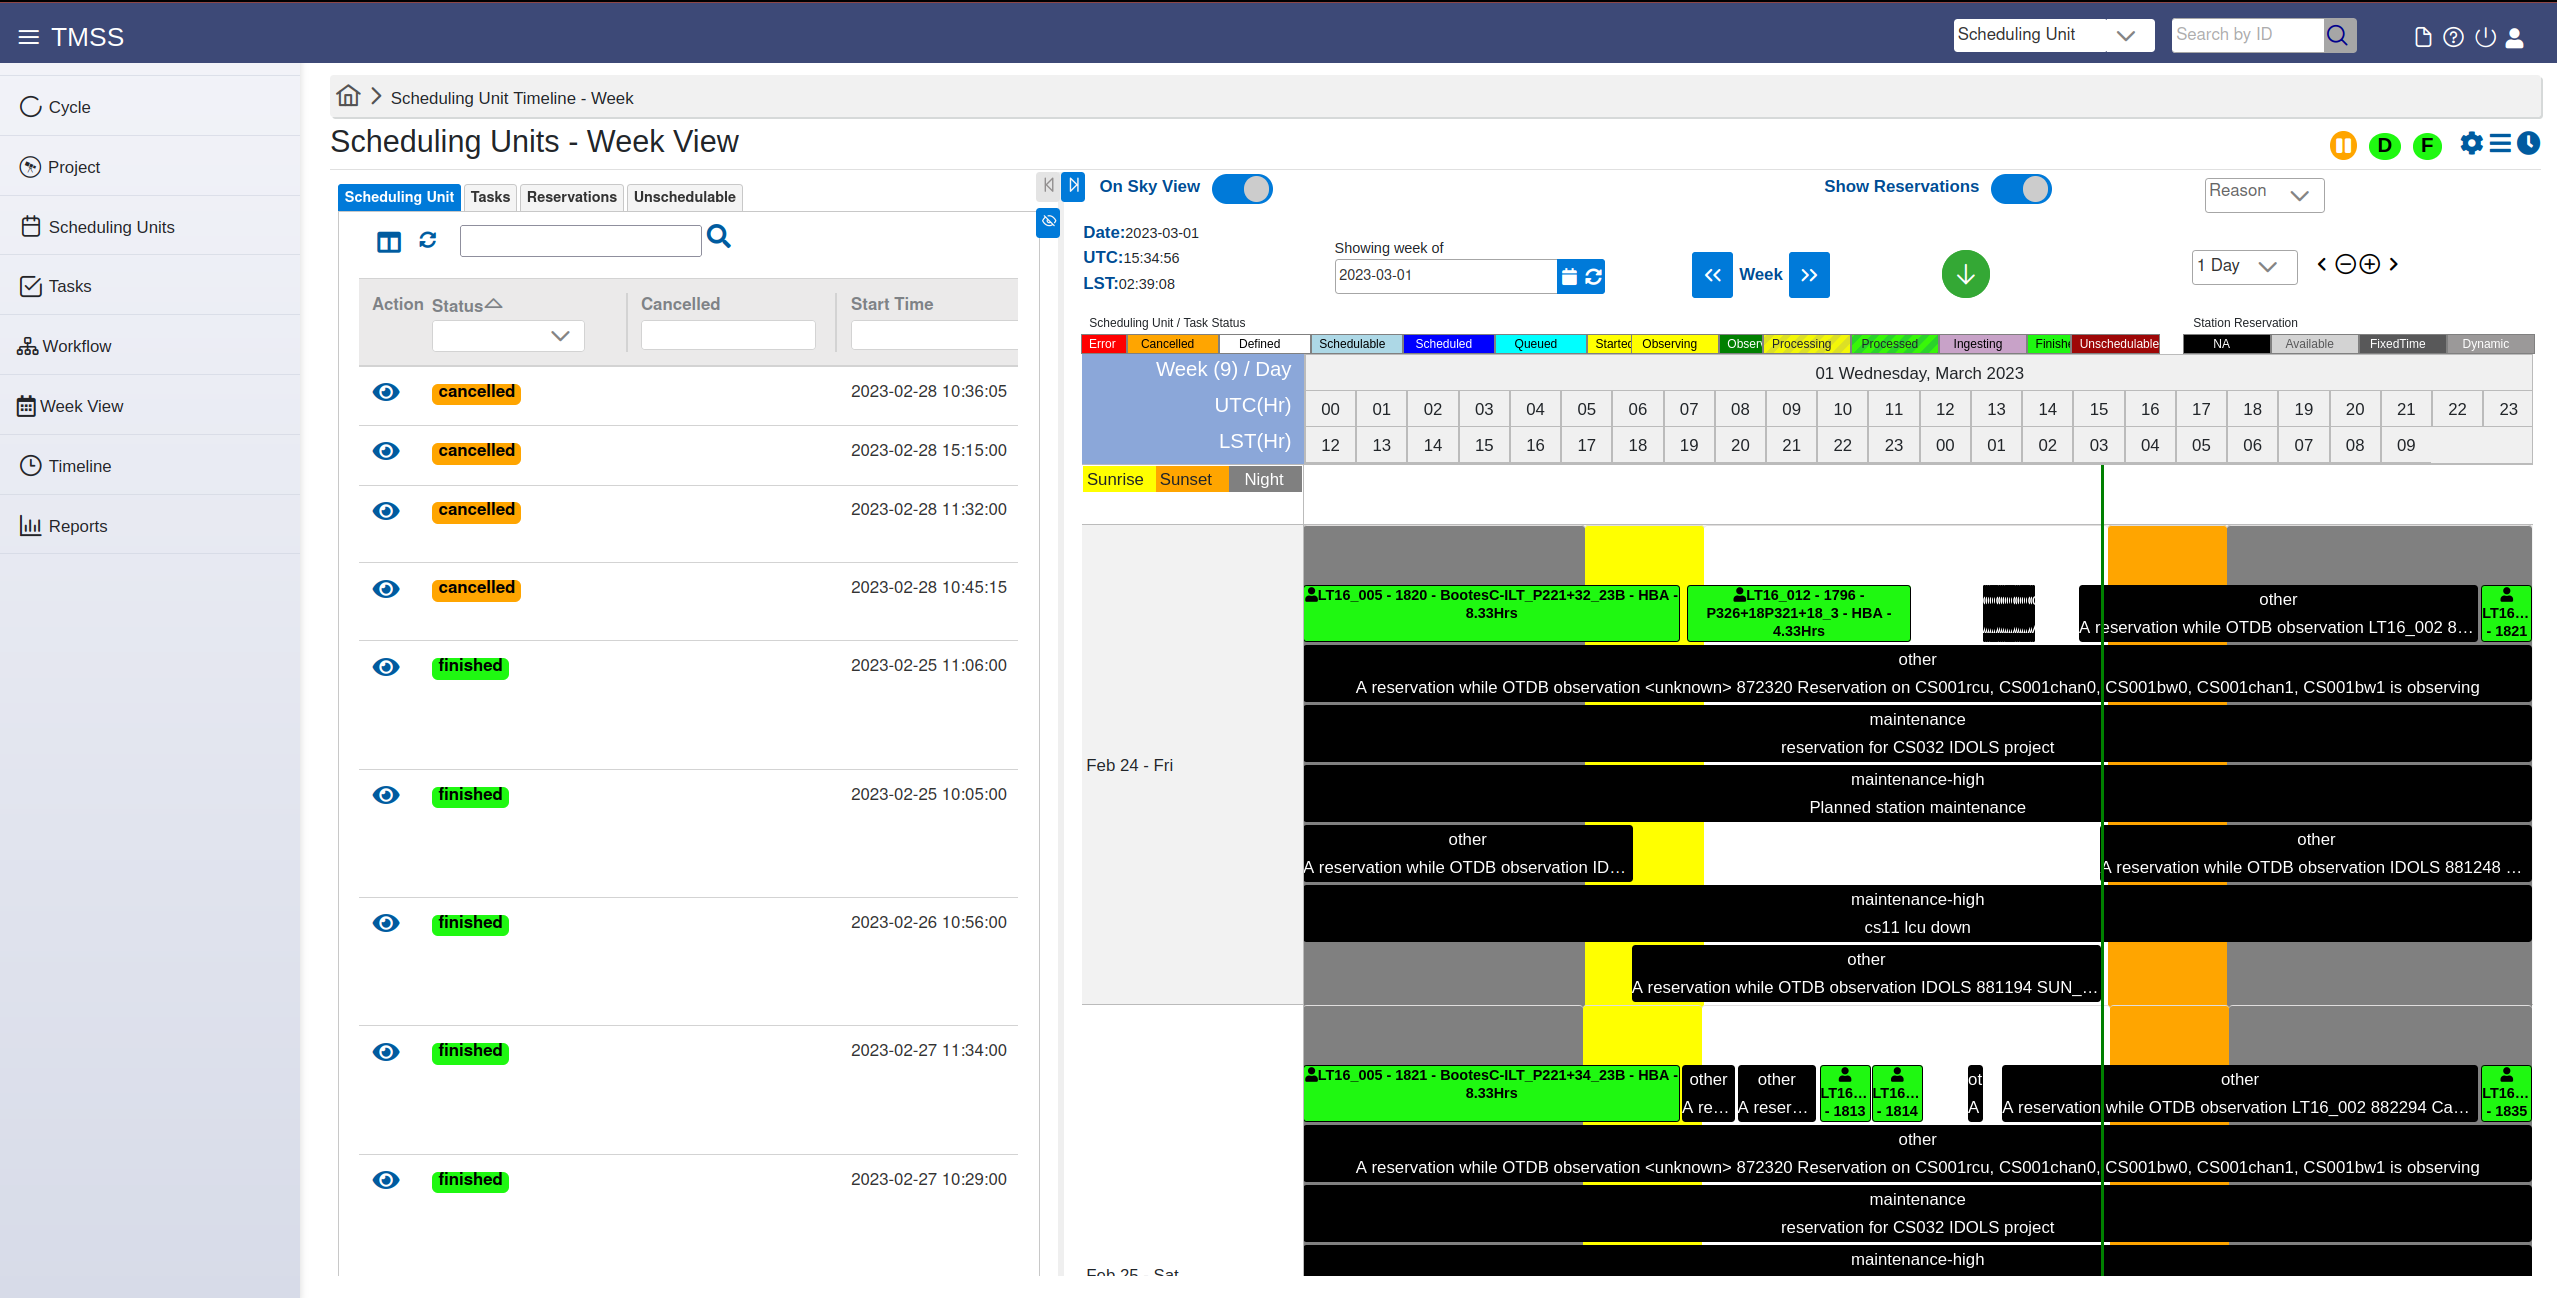
Assuming you have an account with the correct privileges, using the "Keycloak Login" button and entering the login credentials, upon successful login the TMSS landing page will be displayed showing the scheduling units in the (default) week view:
Interface
Users can navigate TMSS through different menus and tabs. This section aims to present an overview of the items contained in the sidebar menu (which is always visible and can be expanded by clicking on the icon in the top left corner of the screen). These items are: Cycle, Project, Scheduling Unit, Tasks, Workflow, Week View, Timeline and Reports. The figure below illustrates how these entries relate in a hierarchical structure to the entities connected with a given observing project.

Cycle
The Cycle menu item displays a page listing LOFAR observing cycles. These cycles contain all the projects accepted for observation from a given LOFAR proposal cycle. In TMSS, this menu shows the Cycle code, the start and end dates of said cycle and the number of projects within that cycle in TMSS. By clicking on the eye icon next to each cycle code one can see additional details of that cycle plus detailed information about the projects within that cycle.
Project
The Project menu item entails details about all of the various observing campaigns specified in TMSS, enables the specification of new projects as well as the change of project statuses. The table on this page exposes the main project properties, i.e. the Project Name, its status, its project category, a small description of the science objective, where the data will be stored, to which cycle the project belongs, the observing time, processing time, the storage size required, the assigned 'friend' of the project, and lastly the My Roles that shows the user's involvement with this project on TMSS.
Production projects are named according to the corresponding category, e.g. LC- for regular, LT- for long term and DDT- for Director's Discretionary Time. A project can have several statuses:
- Opened - Project has been created but is still subject to change
- Active - Project is active and observations can commence
- Finished - Project is finished either because the observation is finished or the cycle is over
- Cancelled - Project is cancelled and no observation will be taken
- Suspended - Project scheduling is (temporarily) on hold
Clicking the eye icon next to the project name/code the user is redirected to a new page. At the top of the page the user can find the Project-details which give an insight regarding the Project's initial set up. Additionally, that the user can find a table which contains all the SUs related to this specific project along with their specification details.
Week View
The Week View menu item page displays a complete overview of the dynamical LOFAR schedule. The user can quickly monitor the order and current status of different SUs along with their respective details. Note that the view is filtered, i.e. is only exposed the SUs relevant for the user science projects.
Starting at the top left, the user can see details such as current data and current time in UTC and LST. Next it shows the currently week that is being displayed by TMSS (which shows a range of 10 days). The week can be changed by clicking the calendar icon right next to the yyy-mm-dd display. Next to that is also another way to change the displayed week (the arrows next to the text Week) to scroll a week forwards or backwards. To the right of that a green arrow icon can be found which will reset any zoom-ins and display current time/week if clicked. Next are the zoom-in/out functions. The user can select to what view the user wants to zoom-in/out to (e.g. 12 hours makes the view zoom into a 12 hour view of the selected day in the calendar). All these above mentioned tools are useful for navigating the week view of TMSS.
Then comes the actual calendar view itself. The week view shows tasks and scheduled blocks at the level of scheduling units. At the very top of the calendar there are small boxes which serve as a legend to the display below.
The scheduler starts with the current displayed week and current day, followed by a view of of 24 hrs in 1 hour blocks in UTC time and LST time. Below this view is another small legend on the left that shows in yellow, orange and grey the time slots for Sunrise, Sunset and Night respectively. These colours are displayed behind the SU/Tasks in the week view on the background.
In this week view the user sees 10 days at a time (at the standard zoom view) that are listed vertically. This way the user can see what is scheduled for a full 24 hr period per day for 10 days at a time. There are several blocks with different colours to be seen that change depending on which observations are scheduled. For more information the user can hover over the block of interest to gain more detailed overview for the observation/task in a tool-tip. The black blocks often represent maintenance of specific stations and how long they last, this listed as Not Available (NA).
Timeline (View)
The timeline view is at first very similar to the Week View in terms of legends and header layout. But the main difference here is that instead of dates being vertically displayed and time being horizontally displayed, the timeline view has the dates and time on the horizontal axis, and the pointings on the vertical axis, giving a different overview. Here the user can also select to show only SU, only Tasks or both and group them as such. It also allows to toggling between Sky View and Station View (all accessible from the very top of the page).
Basic Project Administration
Users which have the TMSS user role 'Friend of Project' (FoP; also, the to be implemented Primary Friend of Project user role) will be able to execute actions related to basic project administration. In what follows, we describe a typical workflow for this user role.
This role assumes that a relevant Cycle as well as Project have already been created. The Cycle and Project entities as well as the details of their creation and editing are out of scope for the FoP user role and are described elsewhere in this Manual.
An overall schematic view of the workflow for creating a Scheduling Unit is shown below. More details regarding the observation specifications are described in the following sections.

Project content specification
During each LOFAR Observing Cycle (LC), different observing campaigns corresponding to the set of approved science projects are performed. These can be regular LC projects, long-term projects (LT) or Director Discretionary Time (DDT) projects. In addition there are (special) commissioning or maintenance projects (COM) which can also be part of a cycle, with the purpose of testing new strategies or testing system health.
Scheduling Units
In order to observe the proposed targets, the observing specifications & pipelines from the proposal need to be translated into system parameters that the telescope can understand. In TMSS, this is done via "scheduling units" (SU).
Projects are organized in sets of SUs. A SU is a collection of system tasks (i.e. Observations, Pipelines, Ingest and Cleanup Tasks) with relations for scheduling blocks and sets and handling of the resulting data product outputs. The user specifies the SU and the associated tasks which contain the details about the observing runs to be performed and the associated data processing. SUs that are being created and are being specified are in the Draft state: they can still be edited. In order for a SU to be schedulable its status should be manually set to Blueprint (after which it cannot be edited anymore). The following table shows the list of the possible statuses that a SU can attain:
| Status | Description |
|---|---|
| Defined | The scheduling unit exists |
| Schedulable | The scheduling unit is defined and ready to be scheduled by the scheduler |
| Unschedulable | The scheduling unit cannot be scheduled because:
|
| Scheduled | The scheduling unit is scheduled at this specific time |
| Observing | One or more observations are running |
| Observed | All observations are finished (or obsolete) |
| Processing | The pipelines are active / in the queue. There are no observations running. |
| Processed | All pipelines are finished (or obsolete) |
| Ingesting | The ingest task is running (and no processing is running) |
| Cancelled | One or more tasks are cancelled |
| Error | One or more tasks are in error |
| Finished | All processes are finished, including ingest |
The SU main menu item exposes the SU - List view.
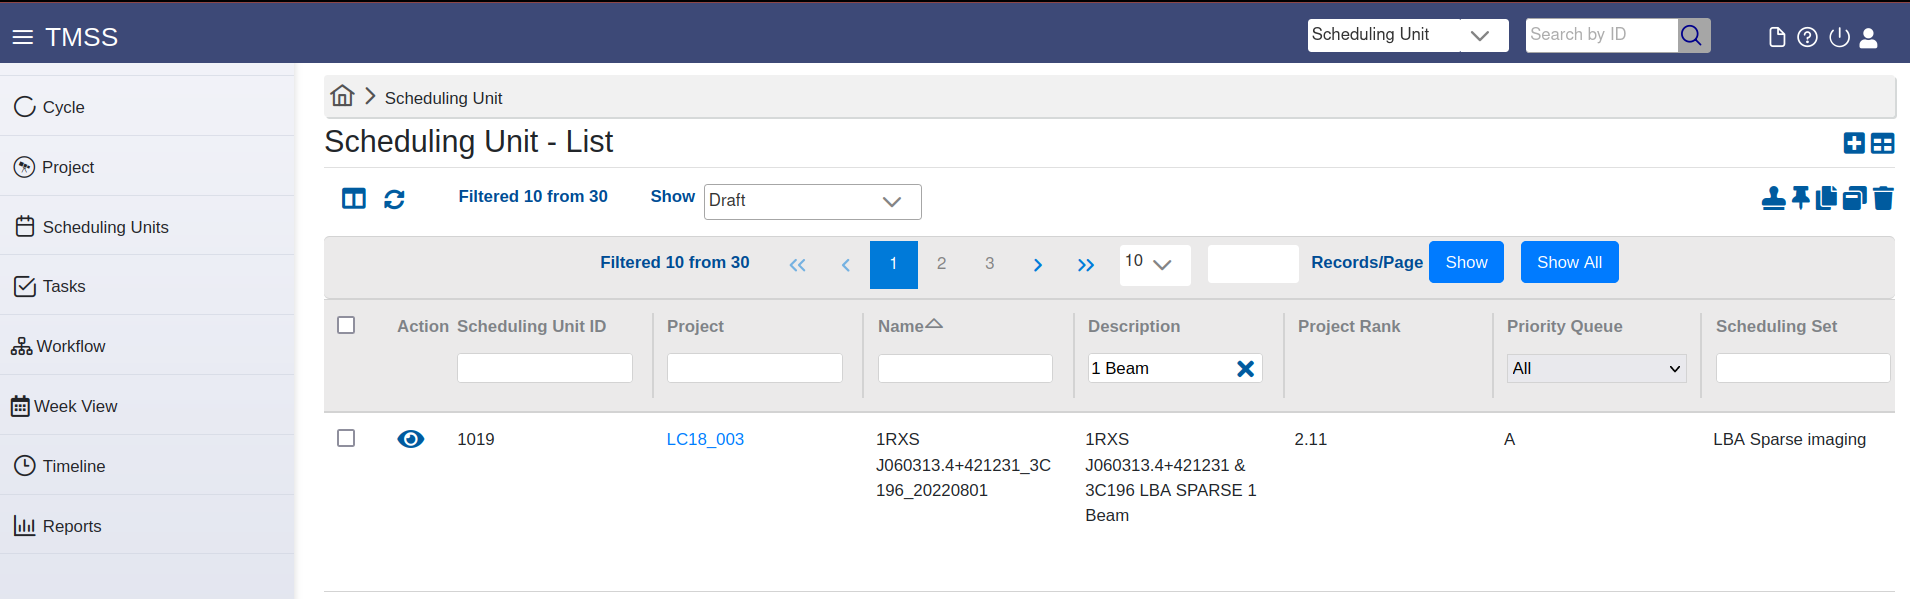
The user can either specify a single SU or a bulk set of SUs. The former is presented in this subsection, for the latter please refer to Scheduling sets subsection.
Add a scheduling unit. When the user clicks on the ![]() icon in the top right corner, the "Scheduling Unit - Add" view is shown.
icon in the top right corner, the "Scheduling Unit - Add" view is shown.
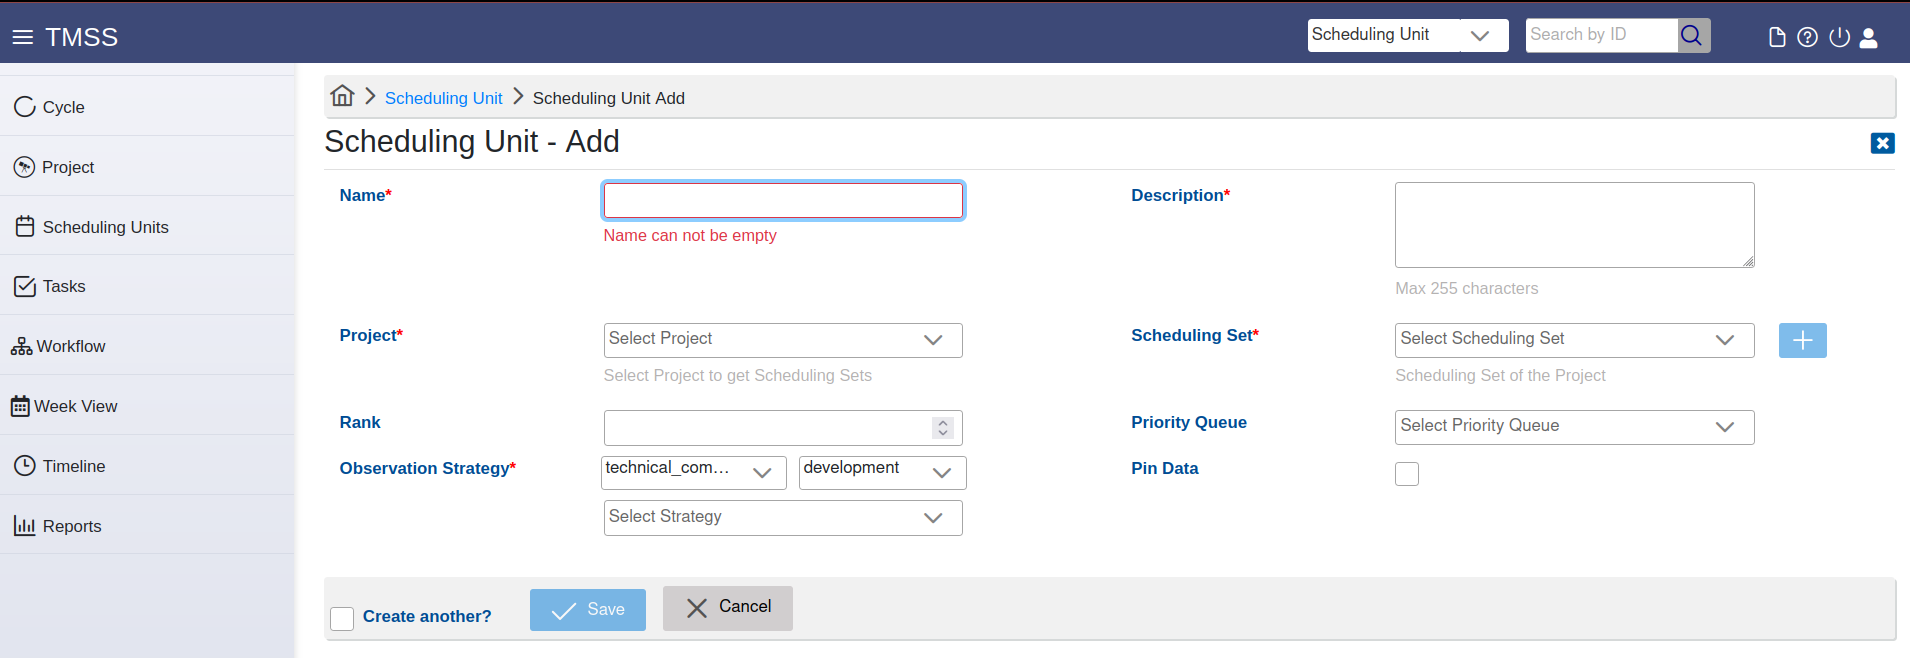
Here, the user can specify a scheduling unit and the related tasks. The specification input fields can be mandatory or optional. The mandatory input fields are marked by a red asterisk. The user needs to: a) enter a name for the scheduling unit, b) chose the related project from the drop bar menu, c) select what observation strategy it should have by selecting the right purpose, state and template, d) provide a small description of the scheduling unit and e) add it to a scheduling set (either by selecting one from the drop-down menu or by creating one through the + icon).
Field name | Content | Examples | Notes |
|---|---|---|---|
| Name* | Descriptive name | P125+45 & P128+46 PSR B0329+54 - run 5 | Can be the name of the target to be observed and/or a description of the observing or test strategy |
| Description* | Description of this scheduling unit | TMSS COM - 5 SAPs LBA strategy v45 validation run. First epoch for the Virgo-W' observation | |
| Project* | Project to which this scheduling unit belongs | DDT19_003, LC20_002 | Select from a drop-down list |
| Scheduling set* | Collection of scheduling units | March observations Calibrator 3C295 | |
| Priority Rank | Rank within the proposal. Range from 0.0000 - 1.0000. Lower Rank has preference in scheduling. | 0.0000 | |
| Priority Queue | Discriminate between prio A and prio B observations. | A B | Commissioning observations are Prio B by default. Check PC stipulations if time is given for both Prio A and B. If no stipulations than rank first targets as prio A. |
| Observing strategy* | Strategy for observations The first two entries are filters on strategy categories. Default stategies to use would be "production" and "active". | LoTSS Observing Strategy Pulsar timing | Select strategy applicable to your project. |
| Prevent Automatic Deletion | Default: Follow project default. | False True | Pin data against deletion after the data has been ingested successfully. This should be set and filled in. |
The user needs to specify an observing strategy. Available strategies can be filtered according to purpose and state usunbg the provided drop-down menus and selection checkboxes to ease the search. More than one filters can be selected, such as:
| Purpose | Description | Example |
|---|---|---|
| Production | Strategies available for cycle observations | IM LBA Survey LoTSS Pulsar Timing |
| System Health | Strategies needed for system health monitoring | FE Monitoring Holography Clock Monitoring |
| Technical Commissioning | Commissioning of new strategies or new telescope functionality | Pulsar Timing Scintillation LOFAR2 LBA+HBA |
| Scientific Commissioning | Strategies for commissioning proposals from scientists | Fast Imaging for Transients |
| State | Description | Notes |
|---|---|---|
| Development | Strategies under development and undergoing testing. | Strategies may not work or are incomplete |
| Active | Strategies used in production. | |
| Legacy | Strategy is no longer used, but should still work. | Can still be used for repetitions if a mode is no longer offered |
| Obsolete | Deprecated strategies | Strategy should not be used, because it is succeeded by a newer version or the functionality is no longer supported |
An overview of some of the available Active Strategies for an observing cycle is shown in the table below:
| Purpose | Strategy name | Description |
|---|---|---|---|
| Production | BF CV 8-bit | Beamformed observation and pulsar pipeline for conversion to raw 8-bit data. HBA, 110-188 MHz, 400 SBs, 195 kHz, 5.12 us. | |
| BF CV FRB | Scheduling unit for Fast Radio Burst observations. Complex voltage observation at 110-188 MHz, 1 ch/SB, 5.12 us. Pipeline outputs to digifil with extra channels. Specification instructions: Keep coherent dedispersion true and set DM > 0 else digifil fails. | ||
| BF CV Timing Scintillation | Beamformed observation and pulsar pipeline for pulsar timing with extra frequency resolution for scintillation studies (default 6x). HBA, 110-188 MHz, 400 SBs, 8-bit raw output (195 kHz, 5.12 us). | ||
| BF FE - Ionospheric Scintillation | A beamformed fly's eye observation with the LBA to CasA, CygA and PerA used for ionospheric monitoring. | ||
| BF Pulsar Timing | Beamformed observation and pulsar pipeline for pulsar timing. HBA, 110-188 MHz, 400 SBs, 195 kHz, 5.12 us. | ||
| IM HBA 1 beam | This observation strategy template defines a single-beam HBA imaging strategy with a Calibrator-Target-Calibrator observation chain, plus a pre-processing pipeline for each and ingest of pipeline data only. | ||
| IM HBA LoTSS 2 beam | This observation strategy template defines a LoTSS (Co-)observing run with a Calibrator-Target-Calibrator observation chain, plus a pre-processing pipeline for each and ingest of pipeline data only. Added cleanup. | ||
| IM LBA 1 beam | LBA Imaging Observing Strategy using 1 Beam and a parallel Calibrator Beam with a pre-processing pipeline for each. | ||
| IM LBA LoDSS 5 beam | LBA Imaging Observing Strategy using 5 Beams and a parallel Calibrator Beam with a pre-processing pipeline for each, used for the LOFAR Decametre Sky Survey. LBA Sparse Even, 14.4-30.1 MHz, 1s, 64 ch/sb | ||
| IM LBA Survey 3 beam | LBA Imaging Observing Strategy using 3 Beams and a parallel Calibrator Beam with a pre-processing pipeline for each, used for the LOFAR LBA High Survey and LBA Co-observing. | ||
| Technical Commissioning | FE RT Test | Test FE observation with one station | |
| Solar Campaign | Solar observing strategy. Imaging + Beamformed observation on the Sun and a calibrator with 127 tied-array beams and a pre-processing pipeline for each SAP. In parallel single station BF spectra in LBA and HBA and 4 consecutive FE observations. |
An overview of observing strategies for some default observing modes:
| Observing mode | Observing mode explanation | Strategy Name | Strategy type | Number of station beams / target fields (excl. calibrator) | Antenna set | Filter | Frequency range/ subband list Subband List | Default station list | Default settings | Free settings | Recommended settings |
|---|---|---|---|---|---|---|---|---|---|---|---|
| LBA Imaging | Imaging with the Low Band Antennas (LBA) is performed with one or more target beams and a calibrator beam in parallel. Scheduling units / scheduling blocks are created with one observation per scheduling unit and these are scheduled independently. | IM LBA Survey - 3 Beams / LBA Co-Observing / LoLSS | Default imaging strategy for ??-?? MHz. Observations can be requested in co-observing mode where high level dataproducts are made available to the user for 1-2 target fields per observation and the other targets are used towards the LoLSS survey. | 3 | LBA_Sparse_Even | 30-90 MHz | NL. Mandatory RS210, RS310, (RS508 or RS509) | Demix | Duration of 3x1 hr or 1x8 hr | ||
| IM LBA LoDSS - 5 Beams | Default imaging strategy for 10-30 MHz for the LoDeSS survey for 5 independent target fields. | 5 | LBA_Sparse_Even | 10-90 MHz | NL. Mandatory RS210, RS310, (RS508 or RS509) | Duration of 5 hours | |||||
| HBA imaging | Imaging with the High Band Antennas (HBA) is performed with one or more target beams within the tile beam. Calibrator observations will be scheduled before and after the target observation, but one of those can be omitted. | IM HBA LoTSS - 2 Beams / HBA Co-Observing | Default imaging strategy for 120-168 MHz | 2 | HBA_Dual_inner | 110-190 MHz | LoTSS subband list. Range . Subbands that have high RFI are replaced by higher frequencies for spectral line studies. | All stations, including International stations, | Recording at 64 ch/subband, 1 second. Preprocessing output at 16 ch/subband, 1 second time resolution | Duration of 8 hrs or 2x4 hrs, depending on elevation. | |
| IM HBA - 1 Beam | Similar to LoTSS, but with a single target beam | 1 | HBA_Dual_inner | 110-190 MHz | LoTSS subband list. Range . Subbands that have high RFI are replaced by higher frequencies for spectral line studies. | NL | |||||
| IM RT HBA - 1 beam / Fast response | Similar to LoTSS, but with a single target beam and omitting the first calibrator observation such that the target observations is performed as soon as possible. | 1 | HBA_Dual_inner | 110-190 MHz | LoTSS subband list. Range . Subbands that have high RFI are replaced by higher frequencies for spectral line studies. | NL | |||||
| Beamformed complex voltage / baseband | This beamformed data mode provides the highest time resolution data. Currently it is offered on a single pointing with several default observing and processing setups. | BF Pulsar Timing | Default beamformed strategy that delivers folded pulsar profiles for known pulsars at 110-188 MHz at a frequency resolution of 195 kHz. | 1 SAP, 1 TAB | HBA_Dual | 110-190 MHz | 51-450 | Core | |||
| BF CV Pulsar Timing Scintillation | Default beamformed strategy that delivers folded pulsar profiles for known pulsars at 110-188 MHz at a higher frequency resolution than the regular pulsar timing observations. | 1 SAP, 1 TAB | HBA_Dual | 110-190 MHz | 51-450 | Core | |||||
| BF CV 8-bit / Compressed raw data | Default beamformed strategy that delivers raw data compressed to 8-bit for flexibility in the analysis. This can be used for pulsar and FRB searches or scintillometry studies. | 1 SAP, 1 TAB | HBA_Dual | 110-190 MHz | 51-450 | Core | |||||
| BF CV FRB / Fast Radio Burst | Default beamformed strategy that delivers a dynamic spectrum at a specified dispersion measure using digifil. This is used for known fast radio bursts. It can in addition deliver the raw data compressed to 8-bit. | 1 SAP, 1 TAB | HBA_Dual | 110-190 MHz | 51-450 | Core |
When the user selects an observing strategy from the drop down menu , the "Scheduling Unit - Add" view expands and the Station Specification, Scheduling Constraints Specification and Task Parameters sections are shown, respectively.
Station Specification
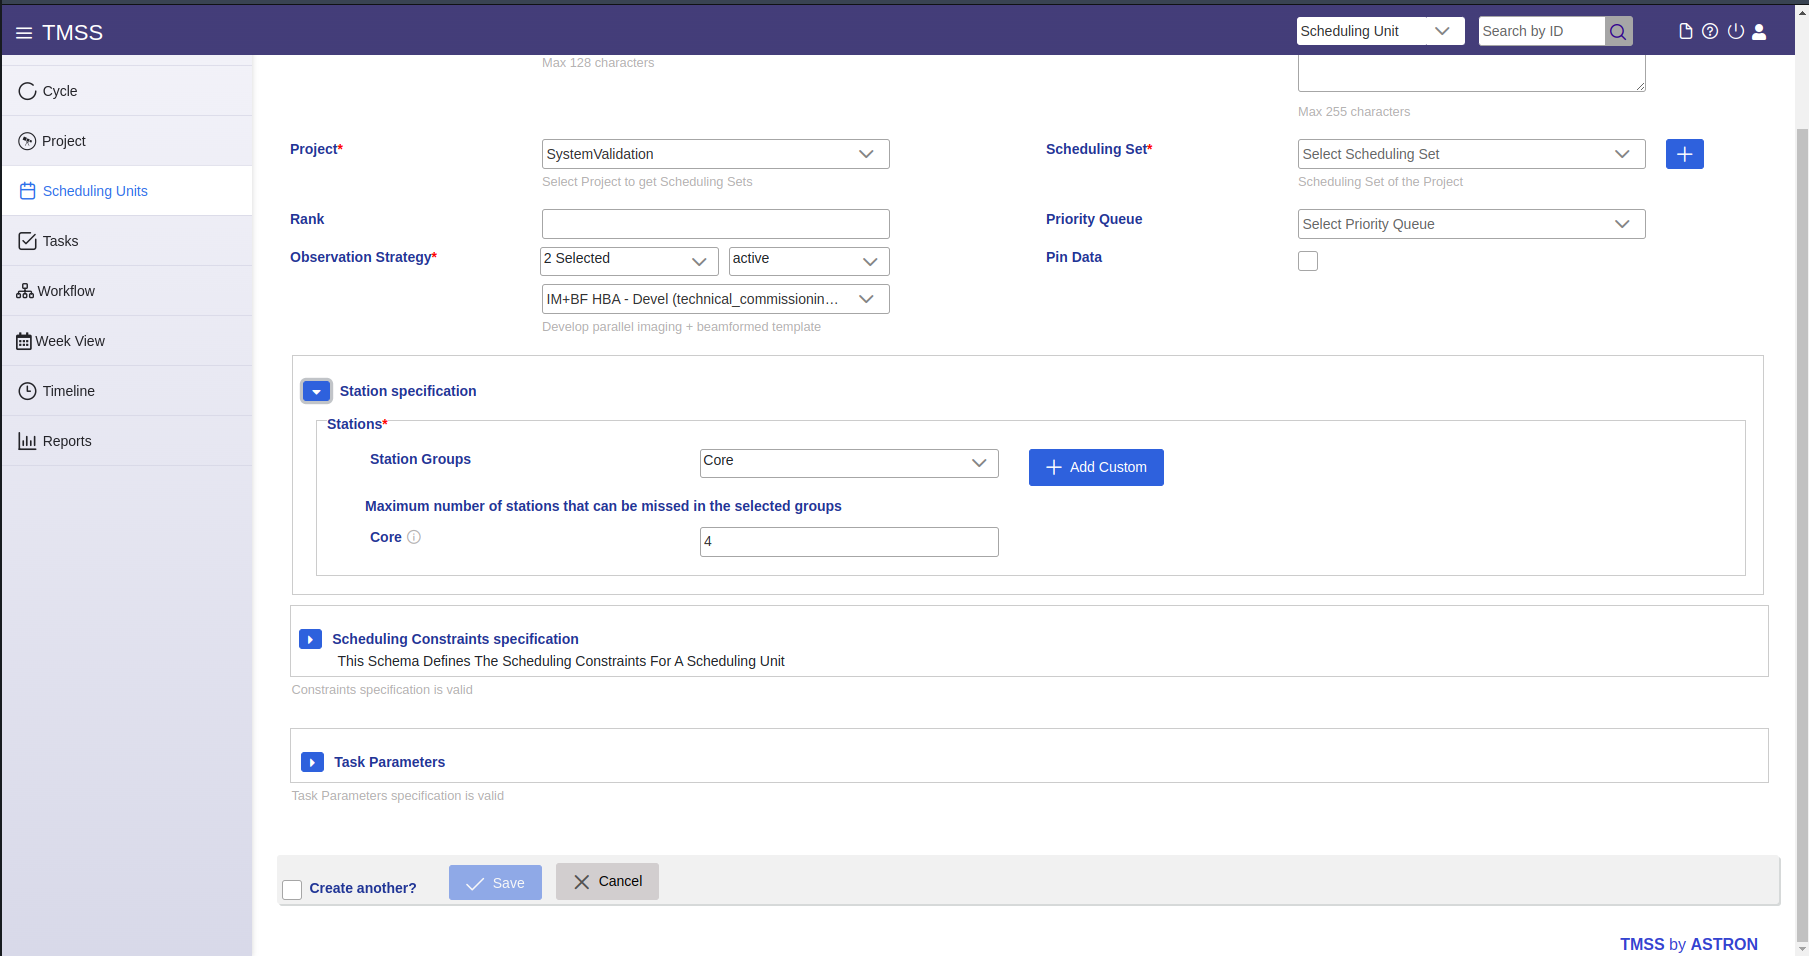
In the Station Groups input field, the user can select which station groups to use, while it is possible to choose more than one. By selecting a station group, a new input field appears with the respective name. In this field, the user can select the number of stations that can be absent at the time the observation is scheduled. Additionally, the user can press the ![]() icon next to the group to see which stations are in it. The available Station Groups and the maximum number of missing stations for each group are listed below:
icon next to the group to see which stations are in it. The available Station Groups and the maximum number of missing stations for each group are listed below:
Station group | Max stations missing |
|---|---|
| Superterp | 0 |
| Core | 4 |
| Remote | 4 |
| Dutch | 4 |
| International | 2 |
| International Required | 1 |
| All | 6 |
The user can also add one or more Custom Groups by clicking the "+ Add Custom" button. In a similar fashion, by adding a custom group two new input fields appear. In the drop bar menu, the user can select one or more station that are gonna be part of the custom group, while at the 'Maximum No. Of Missing Stations' input field the number of absent stations at the time the observation is scheduled. If a station is reserved, it will be removed. If there are too few available stations, the observations will either not be scheduled (fixed_time) or will be scheduled at a later time if possible (dynamic scheduling).
Scheduling Constraints Specification
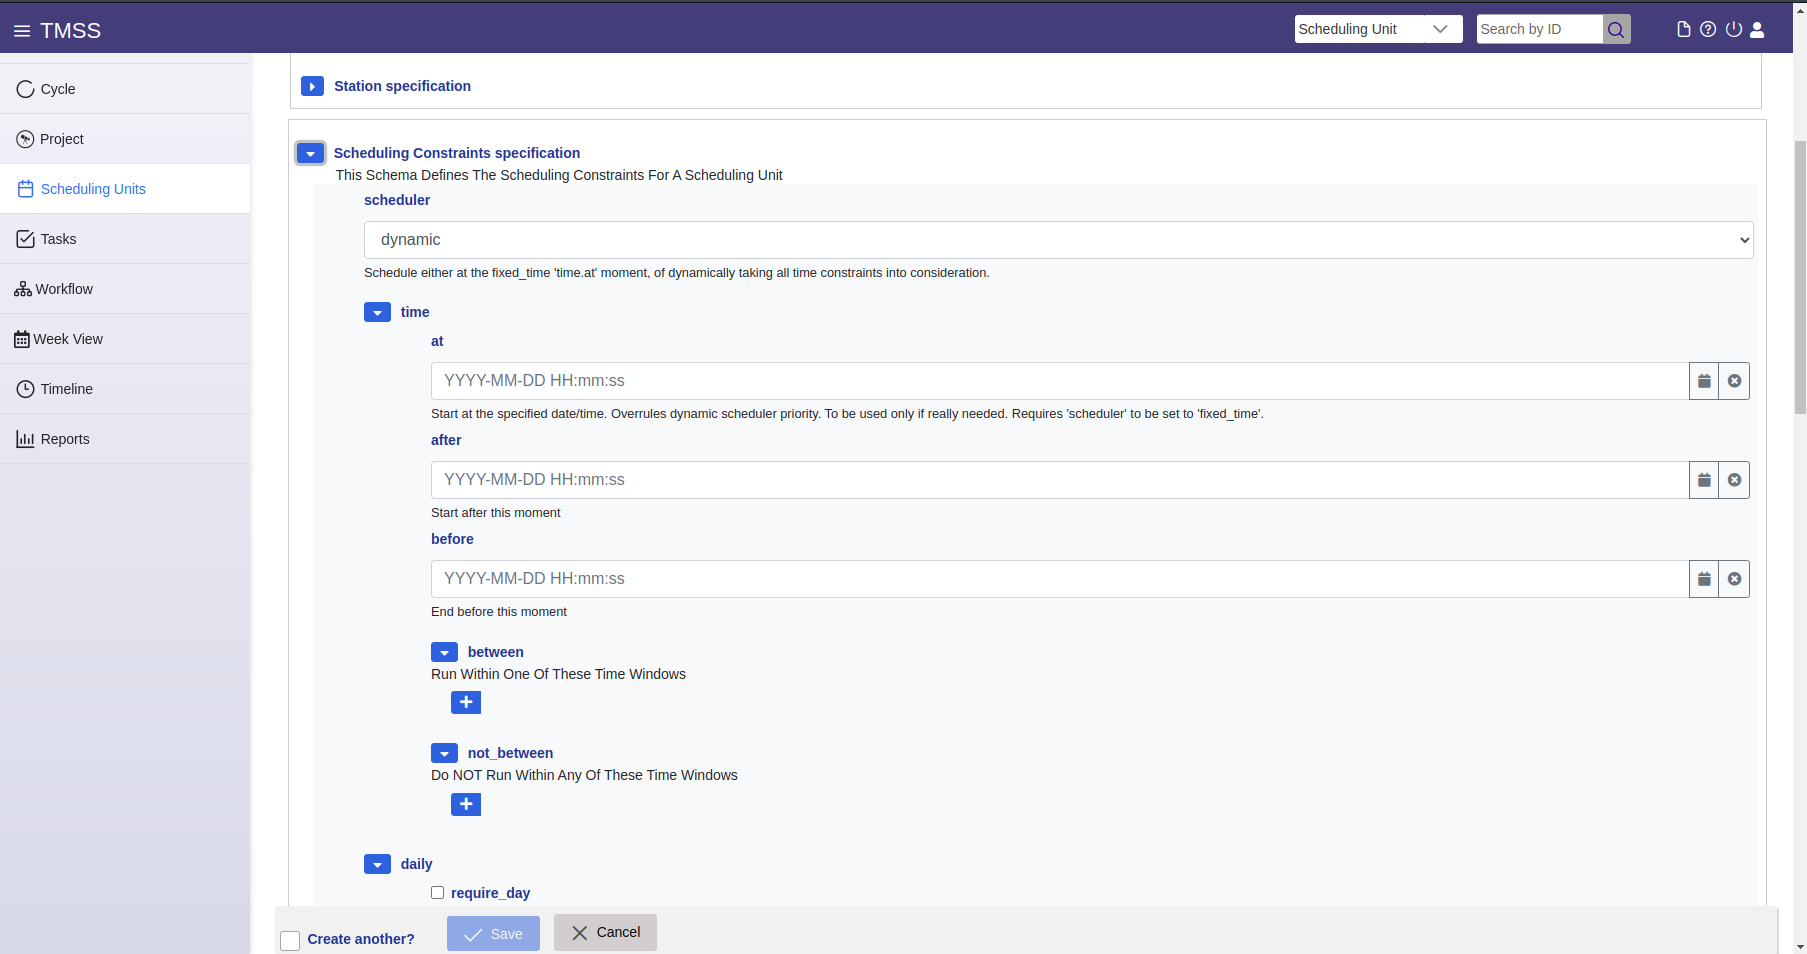
The Scheduling Constraints Specification section lets the user specify parameters to perform scheduling (manual or dynamic) end execution of the observing tasks of the SUs. The scheduling constraints are typically optimised (i.e. with default values) in different ways for the different observing strategy templates. The most common are given below:
| Field name | Content | Examples |
|---|---|---|
| Scheduler | Type of scheduling to use. Default is to use the dynamic scheduler, so scheduling units are picked up automatically, but it is possible to specify fixed time scheduling. | Dynamic |
| time at | Run observations at this specific time. Only use this if really required, e.g., the target is also observed with another telescope. Specifying this option circumvents priority scheduling and should be used with care. | |
| time after | Minimum start time of this scheduling unit. Default: start of cycle | 2021-06-01 00:00:00 |
| time before | Maximum end time of this scheduling unit. Default: end of cycle | 2021-11-30 23:59:59 |
| time between | Only schedule within the time windows specified here. More time-windows can be specified by pressing the + button below. This can be used to distinguish observations that should run monthly be specifying a few days where these observations could run. | From: 2021-07-08 00:00:00 Until: 2021-07-10 23:00:00 |
| time not between | Do not schedule within the time windows specified here. More time-windows can be specified by pressing the + button below. | From: 2021-07-08 00:00:00 Until: 2021-07-10 23:00:00 |
| Daily | require_day : Day time observations. Run when the sun is higher than 10 degrees above the horizon at the Superterp. require_night : Night time observations. Run when the sun is lower than 10 degrees above the horizon at the Superterp. avoid_twilight : Avoid sunrise and sunset. Run when the sun is higher than 10 degrees above the horizon at the Superterp, or lower than 10 degress below the horizon. | |
| transit_offset | Offset in (UTC) seconds from transit for all target beams in the observation. Alternatively, use you can specify the reference pointing as the reference for transit. When the observation is split into shorted chunks to be observed at different LST ranges. Please take into account a one minute gap between subsequent observations. | from -7200 to 7200 from -7200 to -3600 from 3600 to 7200 |
| min_distance | Minimum distance to the Sun, Moon and Jupiter (latter mostly relevant below 30 MHz) in degrees (backend uses radians). Current default 30, or 28.64 degrees | Sun: 30 Moon: 30 Jupiter: 30 (< 40 MHz ) else 15 |
| min_elevation.target | Minimum elevation for all SAPs in the target observations | |
| min_elevation.calibrator | Minimum elevation for the SAP of all calibrator observations | |
| Reference pointing | If true, will be used for transit_offset | enabled=false enabled=true |
Task Parameters
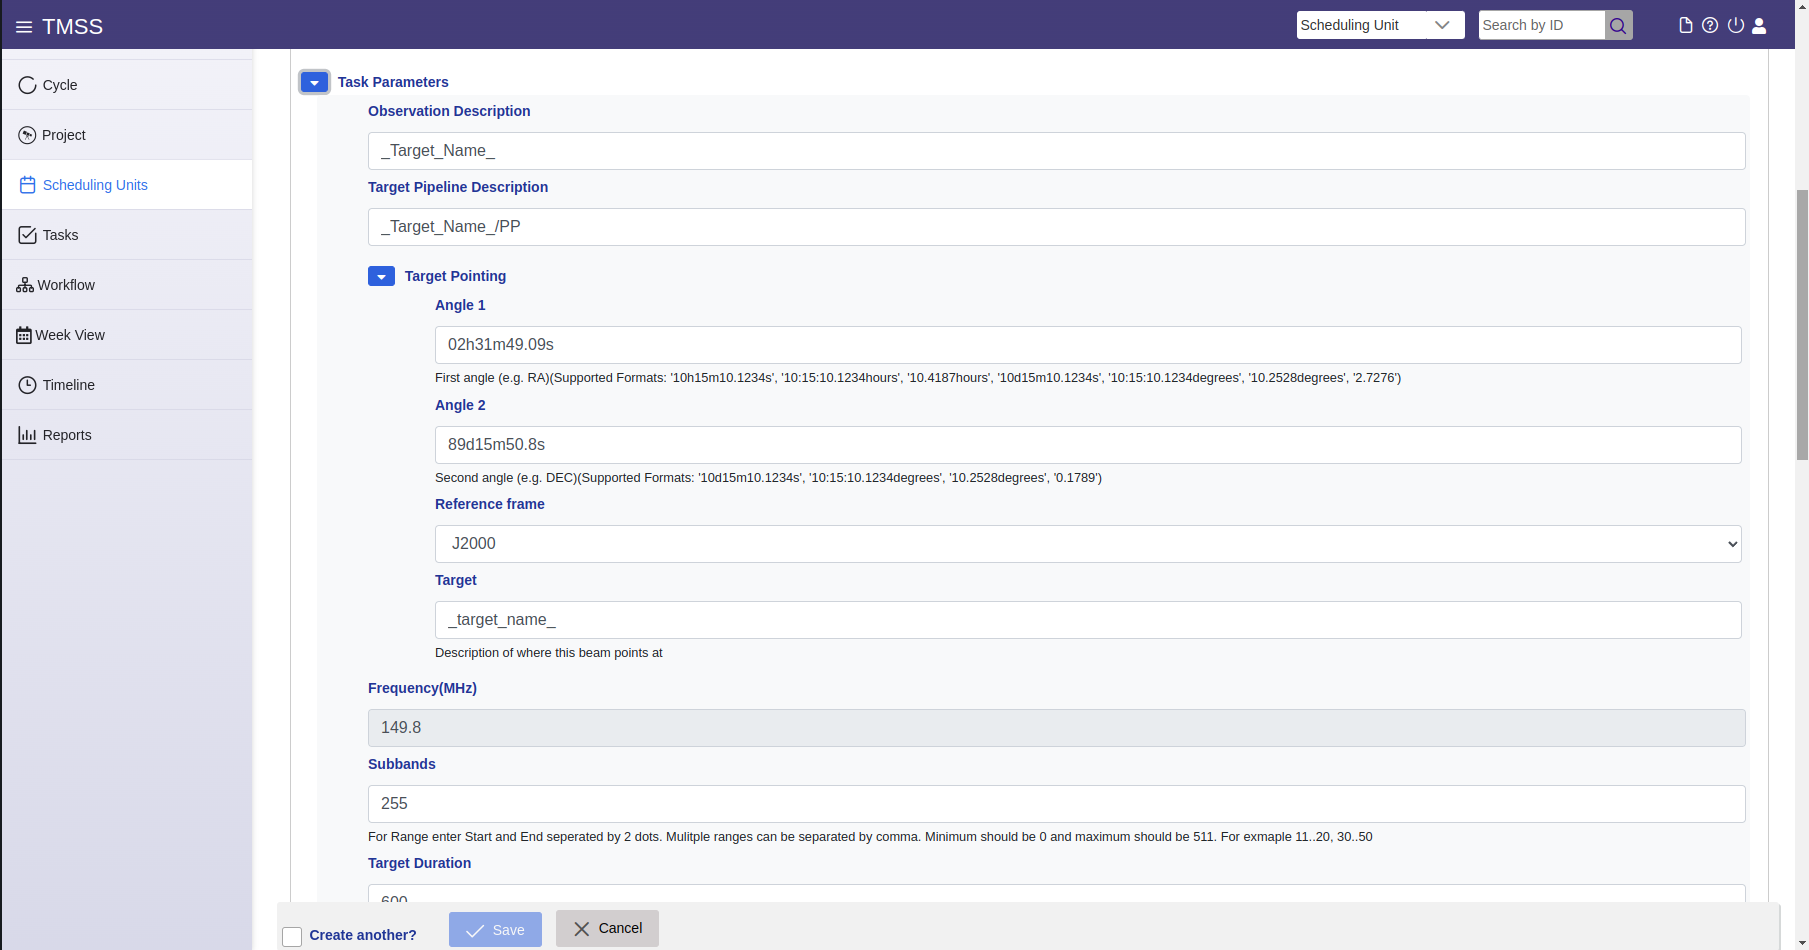
An observing strategy necessitates certain settings and the Task Parameters section allows the user to specify them. In this section options such as pointing, target and observation names, and more advanced options such as sources to demix are included. The given parameters are determined by the observation strategy and thus there are many options and parameters to present. There are different strategy groups, such as Imaging (IM), Beam-Formed (BF), Solar campaign etc., and an in depth understanding of the telescope's capabilities is necessary in order to provide meaningful specification parameters. In this section, the aim is to give a quick overview of the different task parameters that are presented in all the current active strategies.
| Task Parameter | Present in these strategies | Description | Examples |
|---|---|---|---|
| Duration | All except BF FE - Ionospheric Scintillation and FE RT Test | Observation duration in hour:min:sec. For HBA strategies there are additional duration fields for the calibrators and/or additional targets/beam pointing. Similarly some modes have Target Duration which is given in seconds. | 00:02:00 (hour:min:sec) 28800 (sec) |
| Observation Description | All except BF FE - Ionospheric Scintillation and FE RT Test | Usually target (and/or calibrator) name | OOO.O _Target_name_ FRB YYYYMMDDA Paaa+01 & Paaa+02 |
| Pipeline Description | All except BF FE - Ionospheric Scintillation and FE RT Test | Usually target pipeline (and/or calibrator pipeline) name | oOOO.O _Target_name_ FRB YYYYMMDDA/pulp Paaa+01/TP |
| Target Pointing | All except BF FE - Ionospheric Scintillation and FE RT Test | Define pointing to target(s and/or calibrator(s)) given in Angle 1 (RA), Angle 2 (DEC), Reference frame (J2000) and target name | Angle 1: 02h31m49.09s Angle 2: 89d15m50.8s Reference frame: J2000 Target: _Target_name_ |
| Digifil options | BF CV FRB | Relevant options for siggle-pulse searches | DM: 0.0001 Nr of Frequency Channels: 320 Coherent Dedispersion: true Integration time: 4 |
| Raw output | BF CV FRB and BF CV Timing Scintillation | Whether to include the raw data in each output data product | false true |
| Sub-band per file | BF CV FRB and BF CV Timing Scintillation | The maximum number of sub-bands to write in each output data product. | 20 |
Optimize period and DM | BF CV Timing Scintillation and BF Pulsar Timing | false true | |
Sub-integration time | BF CV Timing Scintillation and BF Pulsar Timing | | 10 |
Frequency channel per file | BF CV Timing Scintillation | Number of frequency channels per part (multiple of subbands per part). | 120 |
| Duration FE (1..4) | BF FE - Ionospheric Scintillation, FE RT Test and Solar Campaign | Duration of (one of the) the fly's eye (FE) observation in seconds. Needs to fit within the overall SU duration. | 300 (sec) |
| Description FE (1..4) | Solar Campaign | | IPS FE1 |
| Pointing FE (1..4) | Solar Campaign | Define FE pointing given in Angle 1 (RA), Angle 2 (DEC), Reference frame (J2000) and IPS name | Angle 1: 02h31m49.09s Angle 2: 89d15m50.8s Reference frame: J2000 Target: _Target_name_IPS |
| Frequency | IM HBA 1 beam and IM LBA 1 beam | Frequency range of the observation, i.e. bandwidth covered. | LBA: 21.4-69.0 HBA: 120.2-126.7,126.9-131.9,132.1-135.3 etc. |
| Sub-bands | IM HBA 1 beam and IM LBA 1 beam | Sub-band numbers specification (alternative to frequency). For Range enter Start and End separated by 2 dots. Multiple ranges can be separated by comma. Minimum should be 0 and maximum should be 511. For example 11..20, 30..50 | false true HBA: 104..136,138..163,165..180,182..184,187..209,212..213, etc. |
| Run adder | IM HBA 1 beam, IM LBA 1 beam, IM HBA LoTSS 2 beam and IM LBA LoDSS 5 beam | Do/Don't create plots from the QA file from the observation | false true |
| Tile Beam | IM HBA LoTSS 2 beam | HBA Only, insert pointing of the tile beam given in Angle 1 (RA), Angle 2 (DEC), Reference frame (J2000) and target name | Angle 1: 02h31m49.09s Angle 2: 89d15m50.8s Reference frame: J2000 Target: Paaa+01Paaa+02REF |
| Filter | IM LBA 1 beam | Bandpass filter applied | LBA_10_90 HBA_110_190 |
| Antenna set | IM LBA 1 beam | Select the antenna mode to observe with | LBA_SPARSE_EVEN HBA_DUAL_INNER |
Time averaging steps | IM LBA 1 beam, IM LBA 1 beam and IM LBA Survey 3 beam | Factor used to average the data in time | 2 |
Freq averaging steps | IM LBA 1 beam, IM LBA 1 beam and IM LBA Survey 3 beam | Factor used to average the data in frequency | 3 |
| Demix pipeline | IM LBA 1 beam and IM LBA Survey 3 beam. | Given in several drop-down menus per target/calibrator where the user can select what sources to demix. Note that the time step and frequency step in this menu have to be multiples of the previously defined averaging steps. | Sources: CasA, CygA, HerA, HydraA, TauA, VirA Time step: 8 Ignore Target: false Frequency step: 64 |
Edit a scheduling unit
Editing a scheduling unit is done in the most straightforward manner by finding the associated scheduling set filtering in the Scheduling Units tab in TMSS or simply by searching for the SU name in the search bar of TMSS. Then selecting the correct scheduling unit by clicking the
'eye' icon on the left-hand side of the table. Once the user enters the 'Scheduling Unit - Details' menu, make sure you are in the 'Draft' tab of the 'Task Details' section. Now if the user wants to change the global description of the scheduling unit or, for example, wants to change the project or description, one can click the 2nd icon on the top right (pencil and paper icon) to change the SU's Details. From this view, the user can also change the Task Details by selecting the appropriate task that needs changes and clicking the edit button that is right from the Task Details header. Below the Task Details section one can see the familiar Observation Specifications as shown during the SU creation and these can be changed accordingly as well on a SU level.
Tasks and sub-tasks
The tasks are already defined when creating a scheduling unit, and the standard form of the tasks is already created for the given strategy chosen for the SU. Each observation strategy has a unique set of parameters that ultimately define these tasks. In the most general case, tasks are divided in different categories that are: Observation, Pipelines and Ingest. Most often the Observation tasks (depending on the strategy) consist of the Target observations (the number depending on how many beams the strategy has) and some Calibrator observation. The Pipeline tasks consist of a pre-processing pipeline associated with each calibrator, and a pre-processing pipeline for each beam in the strategy. Lastly the Ingest tasks consist of ingesting the pre-processed data products to the indicated destination (defined in the project) and a cleanup which removes the data from the disk. Each of these tasks can be viewed in their 'Task - Details' through the eye icon and their sub-parameters can be inspected and changed.
Observation Task Specification
Within an Observation Task the user can view and edit the observation specification, such as the station set-up, observation duration etc. Very similar so what was written before during the SU creation
Pipeline Task Specification
Within a Pipeline Task the user can view and edit the parameters for the pre-processing pipeline such as averaging factors, RFI flagging strategy and cluster details.
Ingest Task Specification
Within a Ingest Task the user has to make sure that the predecessor tasks are correct before the ingest and cleanup happens.
Bulk Scheduling Units Specification (Scheduling Sets)
During the creation of a SU, the user can add the SU to a Scheduling Set which can be used as an easy filter in the SU menu to search for the appropriate tasks, but if for example the one pointing the SU has been created for is part of many different SUs in a project, then it has to be sorted into the correct Scheduling Set belonging to that one project. A user can also create multiple SUs at once that are then belonging to such a scheduling set by using the ![]() button. This introduces the following menu to the user:
button. This introduces the following menu to the user:
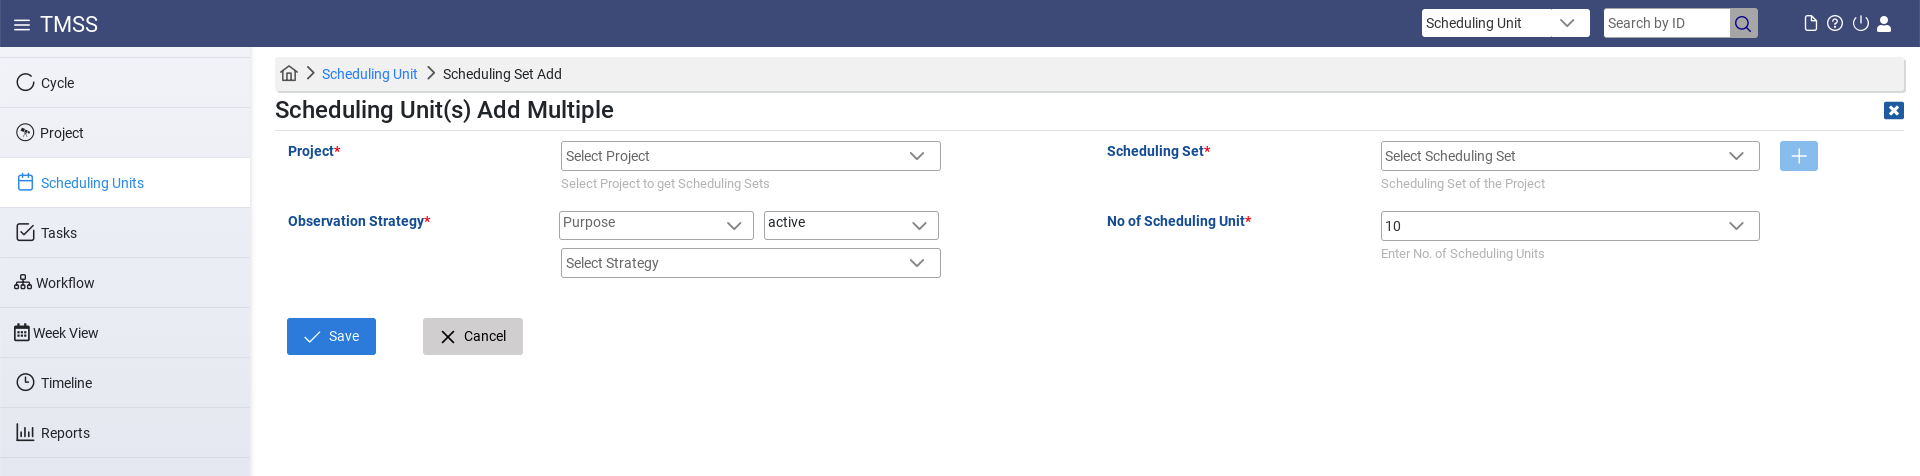
From this menu the user can specify the creation of scheduling units in a similar way as before but with the addition that they can select how many scheduling units one wants to make that belong to the same scheduling set. Once the appropriate scheduling set is chosen, this menu unfolds and turns into the view as seen below.
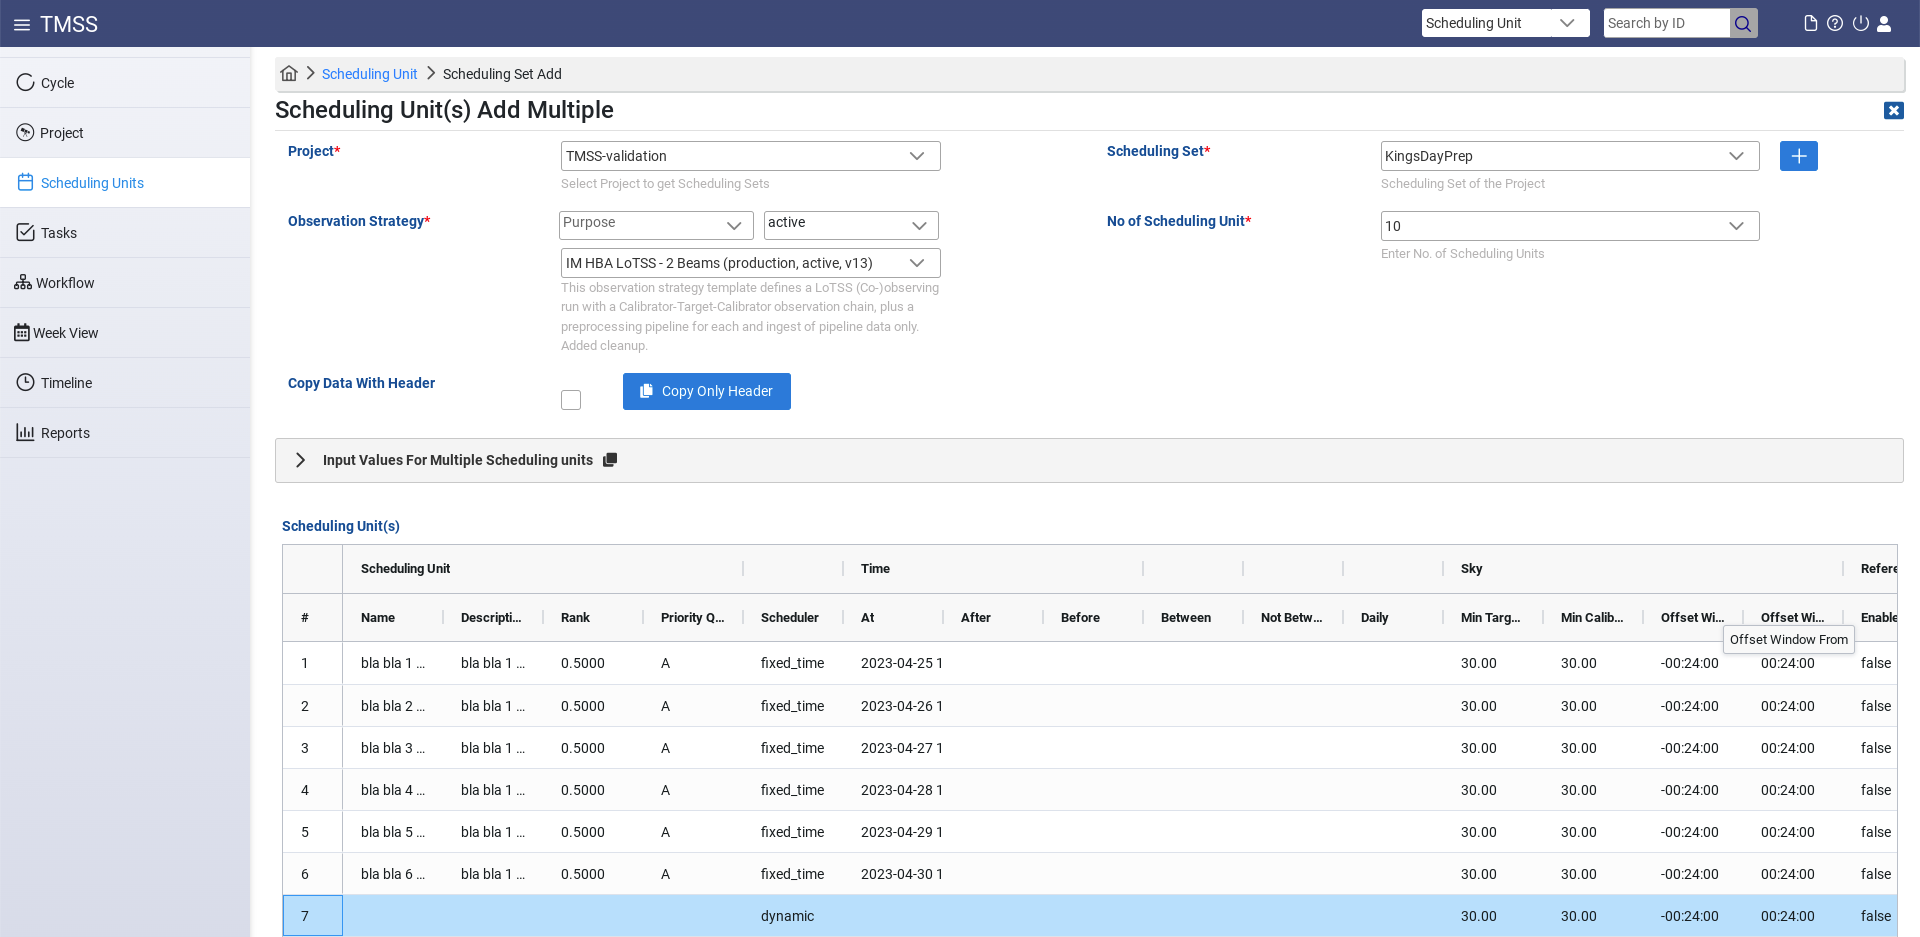
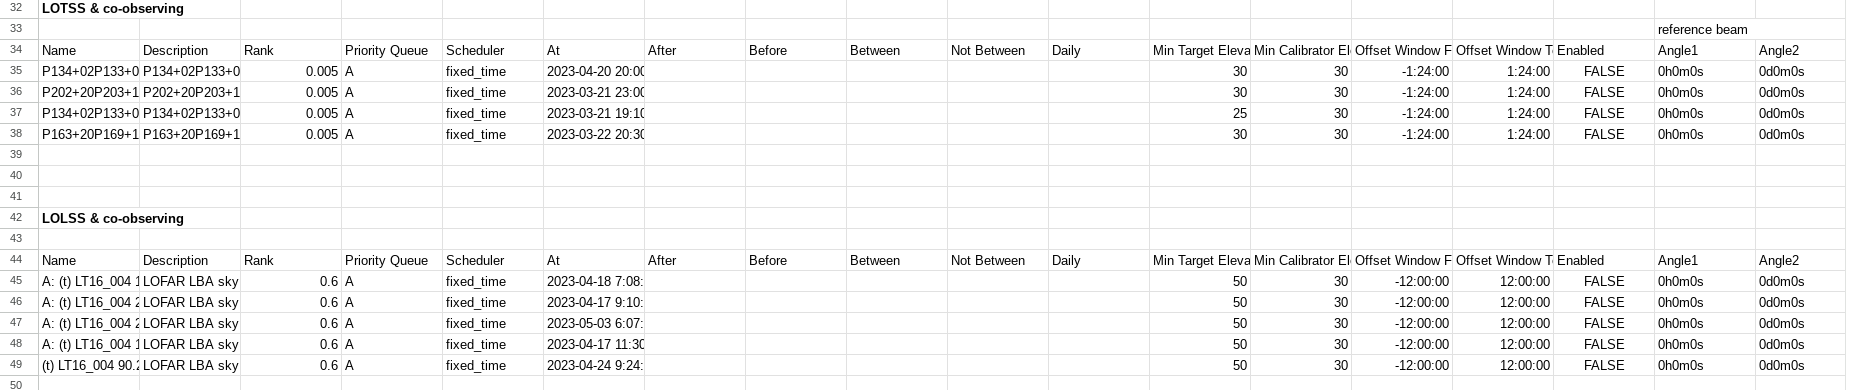
This way it is easiest to define all the appropriate tasks at once, plus through this view the user can easily copy paste the first SU's information into a spreadsheet and perform all needed editing of the fields and finally copy back into the TMSS table view. An example of such a spreadsheet is shown below.
Submission of Scheduling Units
The user may notice that after the creation of a SU from the previous sections the "Type" of the Tasks in the "SU - Details" view are set to Draft. The Draft status allows the user to still edit a task or scheduling unit before submission. However, in order to make a SU schedulable , it has to be properly submitted. This is done by setting the scheduling unit to Blueprint. Once a task has been set to Blueprint the tasks cannot be edited and can be scheduled immediately, so please first make sure all settings are correct. It will be scheduled at an appropriate time which should be visible in the "Week View". To create a blueprint, click on the ![]() icon:
icon:
- On the scheduling unit page
- By first selecting scheduling units on the scheduling unit list page
- By first selecting scheduling units from the list on the project page
Re-submission of Tasks after Failure
It is possible that a task after observing has failed. This can be either due to not meeting the requirements specified in the tasks or due to external circumstances. This requires the FoP to add more tasks to the SU and repeat the process mentioned above. One can add new tasks in a SU by being in the "Scheduling Unit - Details" menu and then clicking on the 'paper-and-pencil' icon next to the "Task Details" section.
This concludes the Observation Specifications description. However, this is not where the responsibilities of the FoP end, as after the observation was successful the FoP has to do the Reporting.
Reporting
Currently the Reporting tab in TMSS is incomplete and reporting on a scheduling unit level is not yet possible. We will be using the Jira system for handling observation reports. After the observations and subsequent processing are completed, the PI will be notified via the Jira ticket associated to the project and the requested data products will be made available through the Long Term Archive (LTA) as soon as possible.
The Radio Observatory will not have the opportunity to check all data manually before it is exported to the LTA, although some automatic diagnostics are generated for system monitoring, and offline technical monitoring will be carried out regularly. The FoP or the expert user in charge of project support will send to the project PI a notification after each observation with detailed information on where to find the relevant plots. The project team is encouraged to analyze the data, at least preliminarily, soon after the observations, and to get in touch through the ASTRON helpdesk about any possible problems. Observations that turn out to have an issue that makes them unusable may be considered for only one re-run, as soon as the observing schedule allows.
Additional information about the observing and processing policies adopted by ASTRON during the LOFAR Cycles is available at the relevant pages.